Imagine this: You’re excited to start your first diamond painting project, but the kit arrives, and—disaster! The drills don’t fit properly, the canvas symbols are blurry, and half the diamonds are missing. Sound familiar?
Unfortunately, not all diamond painting kits are created equal. Some are high-quality masterpieces, while others are frustrating money pits. So, how do you avoid the cheap, low-quality kits and pick one that’s worth your time?
This guide will walk you through the essential factors before buying your next diamond painting kit. Whether you’re a beginner or an experienced crafter, these tips will save you time, money, and frustration.
What’s Inside a Diamond Painting Kit?
Before you even think about adding a kit to your cart, know what to expect inside the box. A proper diamond painting kit should include:
- High-quality canvas (with clear symbols)
- Color-coded resin diamonds (round or square)
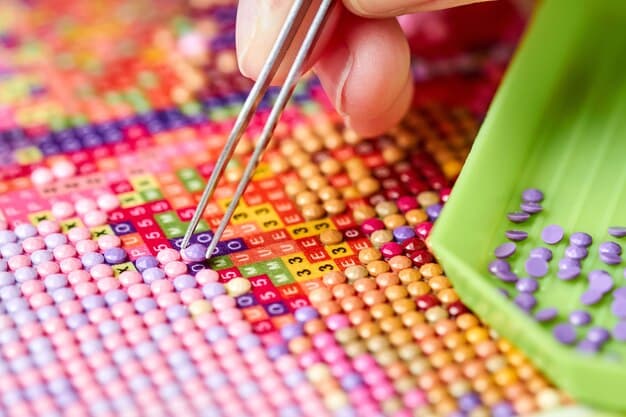
- Diamond applicator pen (for easy placement)
- Wax pad (to help pick up diamonds)
- Tray (for sorting diamonds)
- Tweezers (optional but useful for adjustments)
A diamond painting kit is a complete package that provides everything you need to create a sparkling artwork. The canvas is usually pre-printed with a design and covered with an adhesive layer to stick the diamonds. The resin diamonds come in small, colored facets that match the corresponding codes on the canvas. The applicator pen and wax pad allow for precise placement, while the tray helps keep the diamonds organized. Tweezers are sometimes included to help with adjustments or for those who prefer a different application method.
💡 Tip: Some kits include extra accessories like light pads or storage boxes—a bonus if you plan on doing multiple projects!
Types of Diamonds – Round vs. Square Drills
The eternal debate in the diamond painting world! Should you choose round or square drills? Let’s break down the differences and advantages of each type, including their suitability for different canvas sizes.
Round Diamonds
Round drills are perfect for beginners because they are easier to pick up and place onto the canvas. Since they don’t have to fit perfectly into a grid, they allow for a more forgiving application.
Pros:
- Easier to handle – Because round diamonds are larger and don’t need precise placement, they’re great for those just starting out.
- Faster to complete – Since they don’t require perfect alignment, round drill paintings are often completed more quickly.
- Beginner-friendly – If you’re new to diamond painting, starting with round drills is a good way to learn the technique without getting frustrated.
Cons:
- Small gaps between diamonds – Round diamonds do not fit together perfectly, which can leave tiny gaps between them. While this gives a softer, more blended look, it doesn’t provide the same seamless finish as square drills.
- Less detailed finish – Because of the gaps, round drill paintings may not appear as sharp or defined as square drill projects.
Square Diamonds
Square drills are ideal for crafters who love precision and detail. Unlike round drills, square ones fit together seamlessly like tiles, covering the entire canvas without gaps.
Pros:
- Snug fit with no gaps – Because square diamonds interlock, they create a smooth, seamless look.
- More detailed and sharper images – Square drills enhance fine details, making them the best choice for intricate patterns and realistic designs.
- Satisfying ‘snap’ effect – When placing square drills, you’ll feel a slight “snap” as they lock into place, which many crafters find satisfying.
Cons:
- More difficult for beginners – Square drills require precise alignment, making them trickier to work with, especially for new crafters.
- Takes longer to complete – Because of the added precision needed, square drill paintings take more time and patience to finish.

Choosing the Right Drill Type for Different Canvas Sizes
The size of the canvas you choose affects how well round or square drills will work for your project. Here’s a breakdown of recommended drill types based on canvas dimensions:
Small Canvases (20x20cm – 30x40cm)
- Best for beginners
- Recommended drill type: Round (Easier to handle, faster completion)
- Example designs: Simple floral patterns, cartoon images, basic landscapes
Medium Canvases (40x50cm – 50x70cm)
- Ideal for moderate skill levels
- Recommended drill type: Either round or square
- Example designs: Portraits, detailed landscapes, animal portraits
Large Canvases (70x90cm and above)
- Best for experienced crafters
- Recommended drill type: Square (Provides sharp details, eliminates gaps)
- Example designs: Realistic faces, highly detailed sceneries, intricate artwork
🚀 Pro Tip: If you enjoy creating highly detailed, mosaic-style artwork, square drills will give you the best results with a crisper, fuller look.
Key Factors to Consider When Choosing a Kit
Not all diamond painting kits are the same, and selecting the right one depends on several important factors. Here’s what to look for:
Canvas Quality and Size
- Material matters – A high-quality canvas should be soft, durable, and easy to flatten. Avoid stiff, wrinkled, or thin fabric.
- Print clarity – The symbols should be clear and easy to read to prevent mistakes. Low-resolution prints can cause confusion and eye strain.
- Size considerations – Larger canvases contain more details but take longer to complete, while smaller ones are perfect for beginners.
Round vs. Square Drills
- Round drills – Easier to pick up, apply faster, and leave slight gaps. Recommended for beginners.
- Square drills – Fit tightly together, creating a more detailed and seamless finish. Best for experienced users.
🚀 Pro Tip: If you love high-detail designs, square drills will provide a fuller, mosaic-like effect.
Design Complexity and Skill Level
- Beginners – Start with a small and simple design (30x30cm or smaller) to get comfortable with the technique.
- Experienced crafters – Can try larger, more intricate designs that require patience but offer stunning results.
Toolkit and Accessories
- Ergonomic applicator pen – A comfortable grip makes long crafting sessions easier.
- Tray with deep grooves – Prevents diamonds from spilling.
- High-quality wax pad – Ensures smooth diamond pickup.
- Extra tools – Tweezers, storage boxes, and light pads can improve efficiency.
🛑 Red Flag: If the kit comes with low-quality plastic tools, dry wax, or missing diamonds, consider upgrading separately.
Symbol Clarity and Adhesive Strength
- Symbols should be bold and distinct to prevent mix-ups.
- Strong adhesive is crucial – Weak glue can cause diamonds to fall off, while overly strong glue makes repositioning difficult.
- Poured glue is best – It provides a more durable and smooth adhesive surface compared to double-sided tape.
Brand Reputation and Reviews
🚨 Not all diamond painting kits are high-quality! Some sellers use stock images but send low-quality, pixelated canvases. Before purchasing:
- Check verified customer reviews.
- Look for real customer photos.
- Avoid super cheap kits with no feedback.
💡 Fact: In Dubai, many suppliers offer diamond painting kits, but only a few provide top-tier quality. Stick with trusted brands!
Diamond Painting Kit Tips for Beginners
Starting your first custom diamond painting or broderie diamant personnalisé project? Follow these beginner-friendly tips to make the experience enjoyable and frustration-free!
- Choose the Right Canvas Size
- As a beginner, avoid overly large or intricate designs. A 30x30cm or smaller canvas is ideal to get familiar with the process without feeling overwhelmed. Once comfortable, you can move on to medium (40x50cm) or large (70x90cm) canvases.
- Organize Your Diamonds Before You Begin
- Instead of working with diamonds directly from the packets, use small storage containers or resealable bags. Label them with their corresponding numbers to prevent confusion. A well-organized workspace saves time and frustration.
- Work in Small Sections
- Peel back only a small portion of the protective film at a time. This keeps the adhesive fresh and prevents dust or dirt from sticking to it. Working in sections helps maintain accuracy and reduces mistakes.
- Use a Light Pad for Better Visibility
- If the symbols on your canvas are small or difficult to read, invest in a light pad. It illuminates the canvas from underneath, making it easier to see and reducing eye strain.
- Apply Gentle, Even Pressure on Diamonds
- Once you’ve placed a few diamonds, use a rolling pin or a hardcover book to press them down gently. This ensures they stay in place and don’t fall off over time.
- Keep a Clean and Well-Lit Workspace
- Proper lighting and a clutter-free space make diamond painting more enjoyable. A well-lit area helps distinguish colors easily, reducing mistakes.
- Store Your Work Properly
- If you take a break, cover your unfinished canvas with plastic wrap or parchment paper to keep dust and lint away. This prevents dirt from sticking to the adhesive layer.
- Use the Right Amount of Wax
- Dip your applicator pen lightly into the wax—too much wax can make it difficult to release the diamonds, while too little may not pick them up at all. Finding the right balance will make your experience smoother.
- Keep Extra Diamonds for Future Use
- Don’t throw away leftover diamonds! Store them in labeled bags or containers. Many colors follow the DMC color-coding system, so you might be able to reuse them for future projects or fix missing pieces later.
- Take Breaks to Avoid Fatigue
- Diamond painting can be highly engaging, but spending hours without a break can cause hand fatigue and eye strain. Take short breaks, stretch, and hydrate to keep your crafting session enjoyable.
💡 Bonus Tip: If you accidentally drop diamonds, use a lint roller or vacuum with a stocking over the nozzle to collect them quickly!
Case Study – A Costly Mistake & a Lesson Learned
Sarah, an expat living in Dubai, ordered a huge 60x80cm diamond painting kit for AED 120. When it arrived, she was shocked:
- Blurry, unreadable symbols
- Half the drills were missing
- The canvas adhesive barely worked
After struggling for weeks, she gave up and had to buy a second kit from Trendy Diamond Painting. Lesson learned? Always check reviews and never buy the cheapest option!
Your Perfect Kit Awaits!
Now that you know how to choose the best diamond painting kit, you can confidently start your next creative project. Remember:
- Choose a high-quality canvas with clear symbols.
- Pick the right drill type (round for ease, square for detail).
- Start with a small design if you’re a beginner.
- Check brand reputation & reviews before buying.
🎨 Ready to start your next masterpiece? Choose wisely, and enjoy the relaxing world of diamond painting!